Dapper Snowman Lesson 3
Dapper Snow Couple in Glitzy Costumes


Since I hope you already have the tutorial for the Basic Snowmen this is the tutorial for their costumes. It is important to note though, that for these styles of hat, instead of making the turn slit in the back of the Snowman’s head, make it in the neck area. These hats won’t cover the stitches for the eyes or for the closing slit in the head!!
This will be for both the couple in the black and the Red; the top hat’s are the same and the vests and capes are similar.
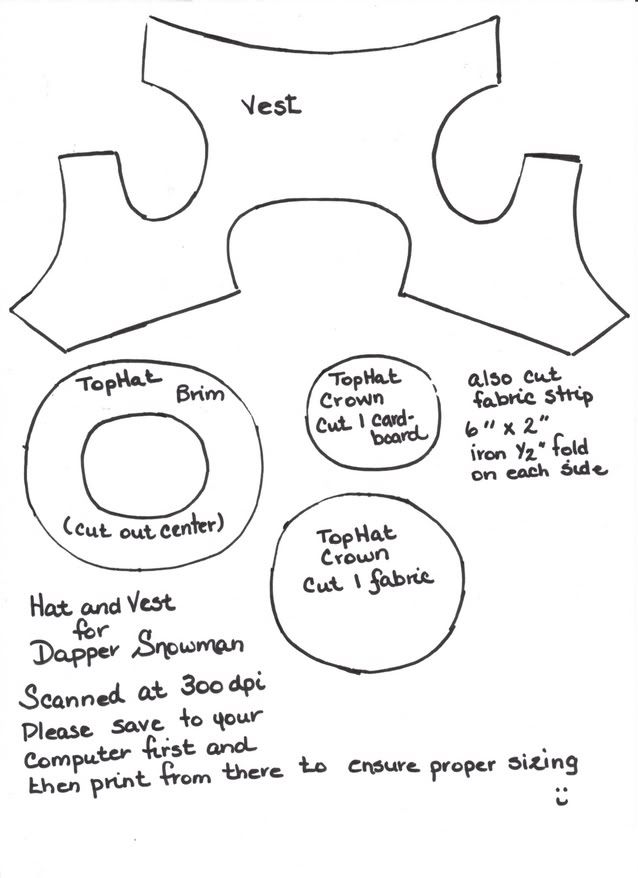
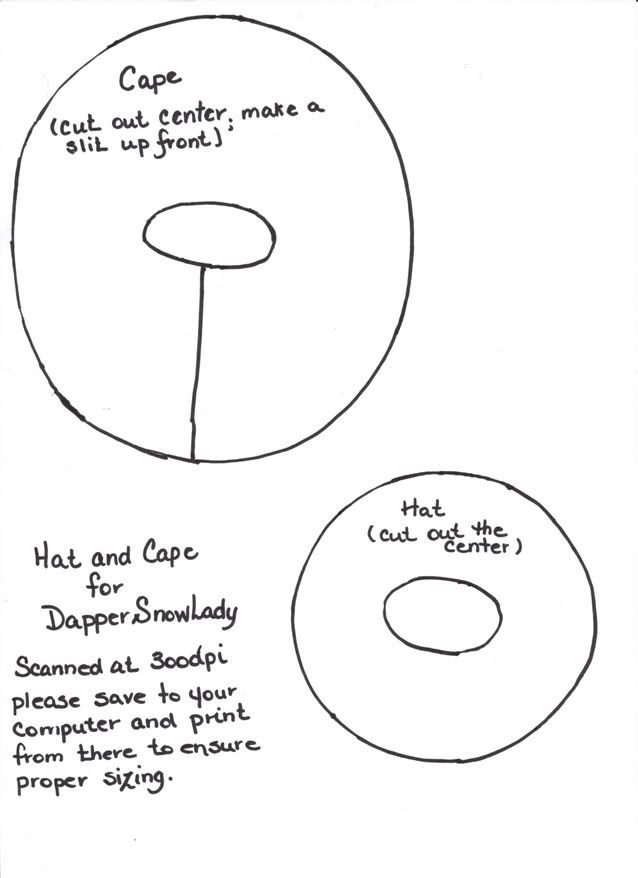
For the pattern pieces you can find them at these two Photobucket links; please save them to your computer and print them from there to ensure proper sizing.
http://i23.photobucket.com/albums/b373/LeeIngram/Projects/coupletemplate6.jpg
http://i23.photobucket.com/albums/b373/LeeIngram/Projects/coupletemplate3.jpg


Here are the photos of the Dapper Snowman Couples…
See PICS 1 & 2:


Materials List:
Tophat:
Tophat:
cardboard tube (i.e toilet paper roll or similar)… 1” in height
Small scrap of lightweight cardboard
Fabric of choice (I used black satin taffeta and red satin) ***please note that Satin is not a great fabric for beginners as it ravels when you look at it ….I used a fusible web on mine
Light weight wire…mine has a fabric covering on it, but I don’t imagine it’s necessary.
Ribbon or braid for the base of the hat (I used a gold braid on the red one and a gold stripe that was in a piece of chiffon fabric for the black one).
Small red rose or whatever you choose for embellishing the side of his hat (here I used a red rose on the black hat and holly leaves and berries on the red hat).
Vest:
Scrap of Glitzy fabric (for the black one I chose a black and gold striped chiffon and for the red, I used red satin same as the hat).
Felt to match your Glitzy fabric
Gold beads ( I used these for the “buttons” )
Felt to match your Glitzy fabric
Gold beads ( I used these for the “buttons” )
Her Hat:
Scrap of Glitzy fabric (the red one is Satin and the Black is a jersey velvet with gold glitter on it)
Felt to match Glitzy fabric
Lightweight wire
Ribbon roses, feathers or whatever you like for the embellishing
Capes:
Scraps of Glitzy fabric
Felt to match Glitzy fabric
Gold Beads (“buttons”)
Red Ribbon rose for embellishing (corsage on the black cape)
Lace and /or braid for the red cape
Felt to match Glitzy fabric
Gold Beads (“buttons”)
Red Ribbon rose for embellishing (corsage on the black cape)
Lace and /or braid for the red cape
Scarf:
Scrap of Glitzy fabric
Threads to match fabrics
Glue gun
Method to make the Vests:
You will need to cut out 2 vests, 1 in your Glitzy fabric and the other from your felt. If you are using the satin, I found that using Fusible web first was a major help in stopping the fraying. So if you are using the Fusible web, please read your manufacturers instructions. I traced around my pattern onto the web and cut it out…
You will need to cut out 2 vests, 1 in your Glitzy fabric and the other from your felt. If you are using the satin, I found that using Fusible web first was a major help in stopping the fraying. So if you are using the Fusible web, please read your manufacturers instructions. I traced around my pattern onto the web and cut it out…
See PIC 3


then ironed it onto my satin, which I then cut out and peeled the backing from the web and ironed it to my felt.
See PIC 4, 5, 6, & 7


If you are using chiffon as I did for the black vest, after the vests were cut out, I placed the Chiffon right side up onto my felt, and stay-stitched around the entire piece, making it one piece of fabric. Then to be sure that it was staying there I changed my stitch setting to a small zigzag and went back around the entire vest. Now your vest(s) are ready to be glued to your Snowman…this step is the same as for your basic Snowman. Gold beads were added for buttons, and the bow ties are just small ribbon bows I glued on . On the red vest I also glued two tiny pieces of very narrow black braid ( known as ratting …very weird name) to each side as if they were the tops of fancy pockets. Now your vests are done.
Let’s make her Cape next:
The cape(s) are made the same as the vests! How easy is that! The red cape also has a lace and braid trim…this I stitched by machine once the satin/felt piece had been cut out. I laid the gold braid on top of the lace and sewed them as one piece all around the edge and up the front of the cape…but not around the neck opening.
See PIC 8


Glue the cape(s) onto your ladies in the same way as the vests. Embellish to your hearts desire. I liked the rose corsage for the black cape and it matches the red rose I added to his hat. Don’t forget some gold bead “buttons”.
See PIC 9


Scarfs:
If you decide to use a scarf on any of them, as I did on the lady in black, it’s just a long narrow strip of Glitzy fabric to match your costume. This is the one place you don’t want the Felt backing. Glue in place with just the smallest dab of glue.
See PIC 10


Her Hat:
Since her hat is sew easy let’s finish her up. Cut out 2 hat pieces, 1 from your Glitzy fabric and 1 from your felt. For the red one I used the fusible web and fused the two pieces together and proceeded to glue the hat on to my Snow Lady. On the Black one I first laid my fine wire around the felt piece and zigzag stitch (using a small stitch) all around the outer edge. Next I laid my Glitzy fabric on top of this with the right side up and again using my small zigzag, stitch the two hat pieces together. Now it’s ready to glue in place…how easy was that! I slide the center opening a little to the back of her head so that I can just see her eyes; you could also give it a slight tilt to the side…reminds me of playing dress up with the dolls. A dab of glue in the back and again in the front is all that you need. Now add your roses, feathers or whatever you have chosen. Because the Black hat has the wire in the brim I can crimp the brim to whatever shape I want. That’s it! Your “Lady” is finished and only waits for her handsome escort. Sew let’s go make his hat.
See PIC 11


His Top Hat:
His Top Hat is my favorite part, so don’t be surprised to see it showing up a lot in future patterns.
First let’s get our cutting done …
Cut 2 brims from your Glitzy fabric
For the crown piece…cut 1 piece from fabric and make sure to cut the smaller piece from the lightweight cardboard.
For the base or tube section of the hat, cut a 1” wide length from your cardboard roll (or wider if you want a taller hat).
Cut a strip of Glitzy fabric 6” x 2”.
On the crown piece of fabric, I will take my cardboard crown piece and trace around it onto the fabric to give me an idea of where I’m going…this is because you are going to make small snips in the fabric all around the edge. When you have that done, center your cardboard crown on your fabric and glue the snipped edges to it. Don’t pull too tight here…you will need a very slight looseness here for the stitching (by hand) later!
The fabric strip needs to have a ½ “ fold iron down on each side . Once this is done, open the folds out and stitch the short ends together to form a tube. This tube will fit like a sleeve down over the cardboard tube. The pieces which you had ironed will now fold to the inside of the tube and here I glue them down…again not to tight, but not too loose either. You need just a little ease for the hand stitching part.
See PIC 12


Let’s do our brim now…
With the right sides together, stay-stitch the outer edge of the brim all around using a small stitch and a narrow seam allowance. Once this has been done you are going to change your stitch to a narrow zigzag and placing your narrow wire to the inside of where you just stay-stitched you will now zigzag over the wire all around the brim. I leave my wire as one long length until the end and clip it then, as I don’t want to be caught short.
See PIC 13


Now you need to turn the brim right side out. The first time I did that I thought I’d never get it, but let your wire bend and it will lay out flat afterwards. It’s do-able. Once I have it turned and flattened back out, I usually will iron it just to help it lay smooth. Now I stay-stitch the inner circle of the hat. Now we’re ready for assembly!
See PIC 14


You’re going to hand stitch the crown to the tube; personally I found a very small needle made this easiest for me and sew I chose to use a quilting needle. Just use small stitches and take a stitch first in the crown and then over to the tube… I use a ladder stitch, and go all around.
See PIC 15


Now you need to glue the tube to the brim. Don’t worry if a bit of the glue gets onto your tube base…you will have a ribbon or braid to cover that. I find mine just sets in very nicely so I just run a bead of glue around the opening in the brim and set my tube on it.
See PIC 16


When the glue has set up I then glue it to the Snowman’s head. I like to set mine just a little to the side, sort of a tilt, near his eyes so I don’t lose that cute look.
See PIC 17


Now it’s time to add your ribbon or braid to the base of the tube; this hides any extra glue that got on your hat too. I found that by starting my ribbon/braid on the right side of the hat, bringing it around and gluing where it will overlap.
…is the perfect place to add an embellishment to the hat such as a rose or the holly/berries. It adds to the hat while hiding where you glued your trim in place.
See PIC 18


Because you have the wire in the brim, you can now give your brim a bit of a bend up on the sides like an actual Top Hat…I think only the Lincoln Stove Pie Hat has the straight out brim. And since you put the wire in there, it would be a shame not to use it. Well ladies, that’s it. You now have your Glamorous Snow Couple.
I look forward to seeing/hearing how you make out. If you have any problems, questions or suggestions, please feel free to email me at any time. I will answer as soon as possible. I can be reached at: crafterbug@yahoo.ca
Hugs ’n Stitches,
Wanda ( Snowmen and Sew Much More )
*DO NOT take photos/directions from this site and post elsewhere without permission from the author!! You may link to this site, but please don't take credit for another person's work. ALL lessons are the author's copyrighted property and not intended for mass marketing.
Thank you, & have fun crafting!
Thank you, & have fun crafting!

