Patriotic Sign

Presented by: raccoon
I put together a list of supplies and materials needed for this class. Please forgive me if I have forgotten something.... I went over the list a couple of times and it seems like everything is on it.
Printer to print out patterns
Pencil Tracing paper
4mm and 10 mm plywood pieces
Acrylic paints in blue, red, white, black and brown
Jars for mixing colors
Paper towels or scrap pieces of cardboard
Paint brushes O
ld toothbrushes
Basic sawing supplies
Sandpaper Drill with 1.5 mm bit for the holes
Wood glue
Wire Cutter
Ruler
Clamps for holding pieces together
Wire for hanging ( I am not sure about the wire sizes in the USA) It just needs to be sturdy and not so thin.
Print the heart and sign patterns out. You will find them here: http://www.craftideas.info/html/patriotic_door_sign_.html and http://www.craftideas.info/html/wooden_welcome_sign.html .
Enlarge them to a size you would like. Print out a couple of sizes of the star template within the heart. You will need 2 small hearts and 2 slightly larger stars. Take tracing paper and trace all of the markings of your templates onto the paper using a pencil. Then turn the tracing paper over, lay it on the wood and trace the markings again. The graphite from the pencil will then be seen on the wood. See PIC 1

Cut the traced patterns now out.
See PIC 2


These are now your cut out pieces.
See PIC 3


Mix your colors. Add black to the blue, add a bit of brown to the red and white. This will make the colors more subtle and not so harsh. Now paint the pieces. The sign gets painted blue, the heart gets painted red and white striped with a blue corner and the stars get painted white. See PIC 4

Now for the dry brushing, take a stiff brush that is flexible. Collect your contrast color on it and wipe the most off again on a piece of old cardboard or paper towel. There should now only be a slight hint of the color still on the brush.
See PIC 5


Drybrush the white pieces with blue. The drybrushing gets done by „pouncing“ or „brushing“ your brush along the edges. The color is subtle looking but not dominant. If you need more color, follow step 5 again.
See PIC 6


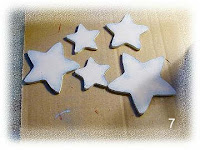
This is how the stars look when finished.
See PIC 7

Now you will drybrush the white areas of the heart the same way. Follow along all sides of the stripe.
See PIC 8

This is a closer view of the white stripe after the drybrushing. Do all of the white areas this way. See PIC 9

Now you will clean your brush and gather the white paint the same way as the blue.
See PIC 10


You will now drybrush all of the red stripes and all of the blue areas just like you did the white stripes.
See PIC 11

This is how the pieces look now.
See PIC 12


To transfer the word „Welcome“ you will do the same as you did the other templates. Make sure your word is in the right direction when transfererring it onto the sign.
See PIC 13


Take a round brush and paint over the pencil lines.
See PIC 14


This is how the word looks when finished. See
PIC 15


Dip an old toothbrush in blue paint. Make sure it is saturated with paint but not dripping. Rub your finger or thumb along the bristles over your pieces and sprinkle the paint over the pieces.
Now the pieces are speckled.
See PIC 17


This is how the heart piece looks now.
See PIC 18


Drill a hole in the top of each heart half. Position the sign over the heart where you would like to have it. Now drill holes in the sign just above each hole of the heart. At the top of the sign, you will also need to drill 2 holes for hanging it up. Make each hole about 3 inches from the side and about ½ inch from the top.
See PIC 19


Place wood glue on the backsides of 3 stars- 1 larger and 2 smaller ones and glue them to the heart in the blue top left corner. Let the glue dry.
See PIC 20


Cut 2 pieces of wire and form a „C“. Assemble the heart to the sign.
See PIC 21


Cut another longer piece of wire (about 1-2 feet) and coil it on a pencil or wooden stick. Now remove the coil from the stick and stretch the coil out. Insert each end of the wire in the top of the sign for hanging.
See PIC 22

So craft friends, I hope that the instructions and pictures were ok! I wish you lots of fun and hope you will enjoy your door decoration for the 4th of July!
Raccoon
My crafty homepages!http://www.craftideas.info/http://www.papercrafts.us/
*DO NOT take photos/directions from this site and post elsewhere without permission from the author!! You may link to this site, but please don't take credit for another person's work. ALL lessons are the author's copyrighted property and not intended for mass marketing. Thank you, & have fun crafting!

